|
Adding security to Web apps may not be great fun but it doesn't have to hard. You can easily ensure your apps meet today's best practices by applying eight principles for secure Web development. by Wei Meng Lee
| ||||||||||||
| Building ASP.NET Web applications has never been easier. Visual Studio.NET hides so many technical details behind the scenes that developers need only concentrate on the core business logic. However, hackers are on the lookout for any opportunity to hack into your application. Which means the pressure is on you to keep defense top of mind. If you don't, you'll quickly find your ASP.NET apps vulnerable to attack.
I've compiled a list of the eight most vital defenses, complete with the information you need to arm yourself against them.
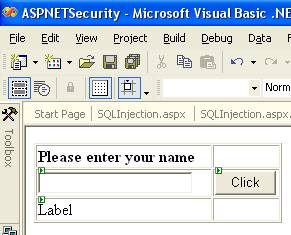
Tip 1—Cross-site Scripting To better understand XSS, consider an example in which your Web application asks for a user’s name via a text box (see Figure 1). When the user clicks on the button, his name will be displayed in the label control. However, instead of entering his name, the user might enter a line of script, such as “<script>alert("Hello there!");</script>” (see Figure 2).
In this case, when the button is clicked, the script will be written to the Label control and the Web browser will execute the script rather than display it (see Figure 3).
Fortunately, ASP.NET 1.1 ships with built-in request protection to detect inputs that contain scripts. Figure 4 shows what would happen in ASP.NET 1.1 if a user tried to enter scripting code in an input control.
Despite the built-in defense by ASP.NET, there were reports of loopholes. By inserting a null character (%00) into the <Script> element, it will bypass detection:
If you need to turn off the built-in script protection in ASP.NET 1.1 for some reason, you can set the validateRequest attribute in your page to false (see Figure 5)
|
|
| ||||||
| Tip 2 —SQL Injection SQL Injection is another well-known exploit that hackers love. But surprisingly there are still a lot of people who don't seem to care about this problem. An example will help illustrate its importance: Suppose I have a simple login form with fields for user name and password. This is a very common function in Web applications. Most people (especially beginning database programmers) will write the functionality as shown:
But there's a far worse danger with such sloppy code. There are certain things that hackers can enter in the password field to query your database. For example, the 'password' shown in Figure 6 will display all user names in the database. This is definitely not something you want to support. Another exploit the hacker can try is known as the SQL Union attack. The following text, entered as a string in either the user name or password text box will execute as shown in Figure 7, giving the hacker plenty of information about your server.
The following shows the updated login method:
Tip 3—Validate your User Inputs
|
| Tip 4—Use Hashing to Store your Passwords I have seen a number of cases where developers simply store users' passwords in plain text. This is a dangerous thing to do; if your SQL Server is compromised, you run the risk of exposing all the passwords. (There are those who argue that if your database server is compromised, it doesn’t matter how you save your passwords—they are no longer secure). A much better way to store passwords in your database is to use hashing. Hashing is a one-way process of mapping data (plain text) of any length to a unique fixed-length byte sequence. This fixed-length byte sequence is called a hash. Statistically, two different pieces of data would not generate the same hash. And a hash cannot be used to reverse-generate the plain text. In the case of saving passwords in the database, saving the hash value of each password is preferred over the saving the plain password. When a user logs in, the hash value of the password is computed and then compared to the hash value stored in the database. In this case, even if the database server is compromised, the hackers have no way of knowing the users’ real passwords (though he could still alter the hash value of a user’s password to one he generated himself and gain illegal access). The following function shows how to use the SHA1 hash algorithm implementation in the .NET Framework: The hash value could then be stored in place of the user’s password.
Tip 5—Encrypt Sensitive Data So, a safer way would be to encrypt the sensitive information and store the ciphertext into the Web.config file. There are two types of encryption algorithms that you can use:
Asymmetric algorithms encrypt and decrypt information using a pair of keys. This pair of keys is made up of a private and a public key. Data encrypted using the public key can only be decrypted using the private key and vice versa. Asymmetric algorithms are much more complex and are computationally expensive. However, it is also much more secure than symmetric algorithms. Listing 1 shows the use of the Rijndael symmetric encryption algorithm implementation in .NET. Listing 2 shows the RSA asymmetric encryption algorithm implementation in .NET. The functions shown in Listings 1 and 2 will allow you encrypt the sensitive data in your Web application, especially configuration and XML files. Listing 3 shows the supporting function used by the functions in Listings 1 and 2. The supporting function converts a string to a byte array. For example, it converts a string "1 2 3 4 5 6 7 8 9 10 11 12 13 14 15 16" to a byte array of {1,2,3,4,5,6,7,8,9,10,11,12,13,14,15,16}. For asymmetric encryption, you need to first create the pair of private and public keys:
|
| Tip 6—Store Secure Information in the Registry Besides encrypting data manually, you might also want to use the registry to store sensitive information. For example, you might configure your Web server to log in to a remote database server using Windows authentication. And so you might configure your Web application to use impersonation, specifying the username and password:
However, storing the username and password in Web.config in plain text is not a good idea. A better idea is to use the registry to store the username and password. In the following series of steps, I will show you how to store your database connection string in Web.config and then use the ASPNET_SETREG.exe utility provided by Microsoft to store the username and password in the registry. 1. Download the aspnet_setreg.exe utility from http://support.microsoft.com/default.aspx?scid=kb;en-us;Q329290. 2. Create a new user account in your Windows machine. I have called it ASPNETUSER with a password of “secret.” 3. Add the <appSettings> element into your Web.config file. This setting saves the database connection string into Web.config:
7. Locate the Machine.config file at: C:\WINDOWS\Microsoft.NET\Framework\v1.1.4322\CONFIG and modify the <identity> element in Machine.config file to:
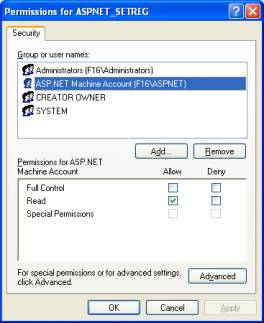
8. Launch the registry editor and navigate to My Computer/HKEY_LOCAL_MACHINE/SOFTWARE/ASPNetApp/Identity/ASPNET_SETREG (use regedt32), as shown in Figure 8. 9. Right-click on the ASPNET_SETREG registry key and select Permissions. Add the user account ASPNET and set it to Read permission (see Figure 9). 10. Give the user account ASPNETUSER FULL CONTROL access rights to the “Temporary ASP.NET Files” folder located in C:\WINDOWS\Microsoft.NET\Framework\v1.1.4322. 11. That’s it! Your application will now run under the impersonation of ASPNETUSER. And the credentials of the user can be securely retrieved from the registry.
|
|
Tip 7—Do Some Housekeeping before You Deploy Your Web Application
Tip 8—Use Sessions, but Not Cookie-less Sessions ASP.NET supports cookie-less sessions, which might seem tempting since many users turn cookies off in their browsers. But don't go down that road: Using cookie-less sessions subjects you to session hijacking, where a hacker can simply use the URL that you are accessing and assume the browsing. The bottom line is, always avoid cookie-less sessions.
Wei-Meng Lee is a Microsoft .NET MVP and co-founder of Active Developer, a training company specializing in .NET and wireless technologies. He is a frequent speaker and author of numerous books on .NET, XML, and wireless technologies. |
'IT_Programming > ASP.NET (WEB)' 카테고리의 다른 글
| [펌] ASP.NET Web.config의 ConnectionString 암호/복호화 방법 (0) | 2009.04.08 |
|---|---|
| ASP.NET 성능 개선 TIP 리스트 (0) | 2008.07.17 |
| [펌] 닷넷에서 자바 클래스 사용 (0) | 2007.06.30 |
| [펌] 우편번호 XML 웹서비스(Web Services) 구축 (0) | 2007.02.11 |
| 웹 2.0 시대에 ASP.NET 2.0에서 몇가지 참고할 부분들... (0) | 2007.02.11 |


